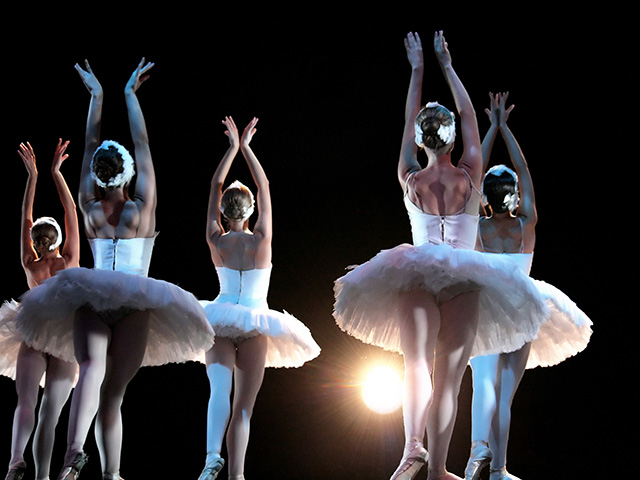
When many people think of dance, they think of the beauty of its motion, its grace and its uniformity. Those qualities, though beautiful, are ephemeral. If you’re a photographer, or simply a parent who’s taken an interest in dance photography, you want to capture the fleeting magic of dance in your photos. Consider these four suggestions on how to do it.
“Photographers need to understand this movement and how to capture it.”
1. Understand Movement
During all performances, whether dancers are beginners or advanced, they’re going to be on the move. For dance photography, you need to understand this movement and how to capture it without ending up with a bunch of blurry photos.
The main way to capture this movement correctly is by focusing the camera. During dance performances, some photographers will use auto focus instead of manual focus, which can take too long and cause you to lose desirable shots. If your camera has the capability, use continuous auto focus so it will stay focused while you move around to capture different angles.
Having a fast lens with a high frame rate is also beneficial. This way, you can continually shoot without having to refocus every single time, and you’ll get more frames out of it. This technique gives you a better chance of capturing that one breathtaking photo. Lastly, consider getting a monopod or tripod, as this equipment can help steady your shot as you move.
2. Get to Know Lighting
Lighting is a critical part of dance photography. However, during dance performances, capturing the right lighting is hard. Many performances will take place in low lighting in dark rooms. Sometimes the lighting will be colored to help set the scene for a performance. As a photographer, this can throw off your images if you don’t know how to handle this dark and colored lighting.
Many theaters and venues also will not allow any flash to go off during the performance, meaning you need to get creative if you’re looking to create the right photo. Moreover, if you are taking pictures at a live event, you must respect the event’s photo policies, as well as the viewing experience of other attendees.
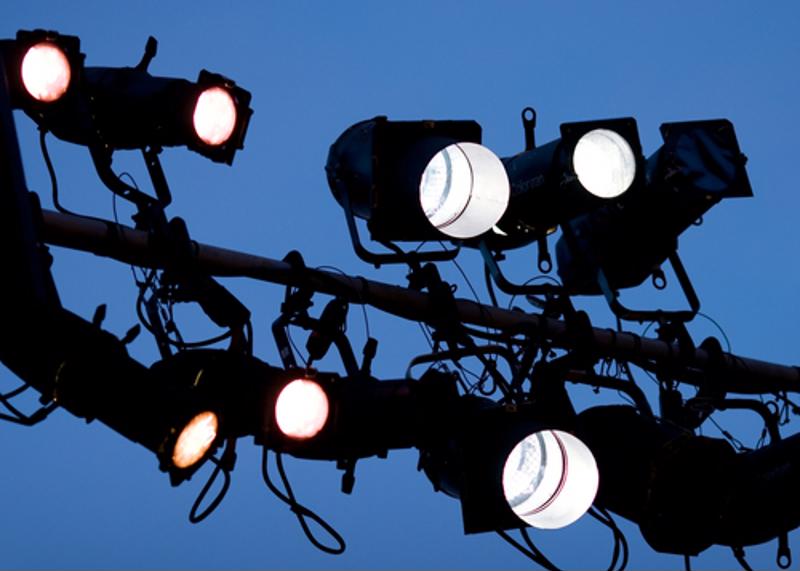 Lighting plays a large part in whether your photos come out great or poor.
First, photographers need to determine the color temperature of the stage. Every type of artificial lighting has a color. For instance, most household lighting is orange, and fluorescent lights are green. Once you’re familiar with reading color temperature, you can easily figure out how to get your best photo.
Go into your white balance settings in your camera and adjust your color temperature which is usually set off by numbers. The lower numbers are for orange and red light, the high numbers are for white and blue lights. If you’re attempting to take photos during a performance with colored light, turn your saturation down as far as it will go. Otherwise, your photos will be oversaturated, which can affect the shape of your figures.
3. Look at Your Setting
Before you start shooting, look at the setting your pictures will be taken in. Are you capturing photos of a single dancer with a backdrop, or are you capturing one dancer with others in the background? Looking at your background and foreground before you start shooting, and planning your shots, will allow you to take the best photos possible.
If you’re taking photos of a solo performance, try to get decorations and other items within the frame to make the photo more captivating and interesting. You can shoot past dancers in the front of the photo or capture the dancers in the front and avoid those in the back.
4. Move With Your Shot
In order to capture the most captivating shots, you may need to move with your subject. Move around to capture different angles and lighting with your dancers. Moving around can be helpful in dance photography whether you are taking photos of one dancer or of a whole group. Even if you decide to stay to the left or right of the stage, changing angles and distance can give you a more dynamic set of photos.